Manage Falco easier with Giant Swarm App Platform
In this article, you will learn how Giant Swarm simplifies the maintenance of the software stack within Kubernetes clusters by using its App Platform technology. Additionally, we will show how customers can leverage this to easily deploy Falco, either individually or as part of Giant Swarm's Security Pack, to secure their managed Kubernetes service.
Giant Swarm
Having CoreOS, Fleet, and Docker as base technologies, Giant Swarm was founded in 2014. In 2016, it chose Kubernetes to reinvent itself. And just a year later, in 2017, it became part of the founding members of the Kubernetes Certified Service Providers. Customers like Adidas or Vodafone backup a company that, supported by a fully remote team, has been able to foresee the trends of technology and working lifestyle.
As a managed Kubernetes company, its services and infrastructure enable enterprises to run resilient distributed systems at scale while removing the burden of Day 2 operations. Giant Swarm takes pride in delivering a fully open-source platform that's carefully curated and opinionated.
Security and simplicity
Giant Swarm takes security as seriously as ease of management. Hence, when using a managed Kubernetes platform, everything that happens on the management cluster is as important as the performance of the workload cluster itself.
That's why, leveraging the concept of operators to control all resources that clusters need as 'Custom Resources', Giant Swarm can deploy and update its management clusters in the quickest possible way. Needless to say, this is exactly what Giant Swarm offers to its customers to manage their applications.
Falco, the Runtime Security Project
Falco is the de facto Kubernetes threat detection engine, and also extends its reach to cloud and Linux hosts. It monitors the behavior of every process in the node and can alert us when something fishy happens.
How does Falco do that? Based on a set of rules that Falco interprets at startup time, it waits for events and syscalls that would trigger one of those rules. When a rule is triggered, Falco raises an alert and, thanks to applications like Falco Sidekick, allows teams to react accordingly.
But with great power comes great responsibility. What happens when we start getting false positives our Falco rules haven't been updated for some months, or our Falco daemon is a few versions behind? The answer is as simple as updating. Well, maybe not that simple if we are responsible for tens of clusters with hundreds of nodes.
Giant Swarm App Platform
Giant Swarm describes App Platform as a set of features that allow you to browse, install, and manage the configurations of managed apps from a single place: The management cluster.

The technology behind it is simple: Apps are packaged as Helm charts, can be configured with values, overridden with a different app configuration, etc. - whatever meets your needs. To deploy, a CRD (Custom Resource Definition) resource is created, interpreted by the App Operator (running on the managed cluster), assigned to the Chart Operator (running on the workload cluster), and in a few seconds, our application will be deployed on as many clusters as desired.
The App Platform offers its repertoire of applications from the App Catalog. Giant Swarm offers two App Catalogs out of the box: The Giant Swarm Catalog and the Giant Swarm Playground. But what we love the most from the App Platform is that we can have our additional catalogs, storing our applications and configurations.
What does it look like on the CLI?
It's now time to look at App Platform running. Let's walk through its deployment on a minikube cluster. Following these instructions, it shouldn't take too long until we are ready to deploy our first managed app, Falco, using a single CRD.
To keep this as standard as possible, we'll even go through some steps to compile some interesting Giant Swarm tools, like the plugin kubectl-gs.
Do you already have a Kubernetes cluster nearby?
If not, we can spin up a minikube instance pretty quickly.
$ minikube start --driver virtualbox
😄  minikube v1.25.1 on Darwin 11.6.6
✨  Using the virtualbox driver based on user configuration
👍  Starting control plane node minikube in cluster minikube
🔥  Creating virtualbox VM (CPUs=2, Memory=6000MB, Disk=20000MB) ...
🐳  Preparing Kubernetes v1.23.1 on Docker 20.10.12 ...
    ▪ kubelet.housekeeping-interval=5m
    ▪ Generating certificates and keys ...
    ▪ Booting up control plane ...
    ▪ Configuring RBAC rules ...
    ▪ Using image gcr.io/k8s-minikube/storage-provisioner:v5
🔎  Verifying Kubernetes components...
🌟  Enabled addons: default-storageclass, storage-provisioner
🏄  Done! kubectl is now configured to use "minikube" cluster and "default" namespace by default
If you don't have kubectl installed or your system, the easiest way to access it would be through an alias to minikube kubectl, like this:
alias kubectl="minikube kubectl --"
Don't forget the -- at the end. That tells the command prompt not to pass any added parameters to minikube, since we need them to be understood by kubectl.
One disadvantage of this method, in comparison to having a local
kubectlbinary, is that thekubectl-gsplugin might not work when called askubectl gs(explained later during this tutorial) so you might need to call it directly.
To ensure our cluster is up and running, execute the following command and verify that all nodes, pods, and containers are up and ready:
$ kubectl get nodes,ns,pods -A
NAME            STATUS   ROLES                  AGE     VERSION
node/minikube   Ready    control-plane,master   4m16s   v1.23.1

NAME                        STATUS   AGE
namespace/default           Active   4m14s
namespace/kube-node-lease   Active   4m15s
namespace/kube-public       Active   4m15s
namespace/kube-system       Active   4m16s

NAMESPACE     NAME                                   READY   STATUS    RESTARTS        AGE
kube-system   pod/coredns-64897985d-qbf4n            1/1     Running   0               4m
kube-system   pod/etcd-minikube                      1/1     Running   0               4m12s
kube-system   pod/kube-apiserver-minikube            1/1     Running   0               4m12s
kube-system   pod/kube-controller-manager-minikube   1/1     Running   0               4m12s
kube-system   pod/kube-proxy-6ds89                   1/1     Running   0               4m
kube-system   pod/kube-scheduler-minikube            1/1     Running   0               4m14s
kube-system   pod/storage-provisioner                1/1     Running   1 (3m29s ago)   4m10s
Prerequisites: Compiling apptestctl and kubectl-gs
As mentioned above, we'll compile a couple of tools. The first one will be apptestctl. This tool will help us bootstrap App Platform on a cluster not managed by Giant Swarm.
To do this, we'll use the docker.io/golang:1.17 image.
The following command will prepare an available instance of a Golang compiler for us to compile both of these tools:
$ kubectl run golang --image docker.io/golang:1.17 -- sleep infinity
pod/golang created
Compiling apptestctl
These steps are quite simple: clone the apptestctl repository and compile it as indicated.
We'll do this inside the container we created in the previous step so we don't pollute our system.
$ kubectl exec -it golang -- git clone https://github.com/giantswarm/apptestctl src/apptestctl
Cloning into 'apptestctl'...
... output omitted ...
Resolving deltas: 100% (791/791), done.

$ kubectl exec -it golang -- make -C src/apptestctl
make: Entering directory '/go/src/apptestctl'
... output omitted ...
====> apptestctl-v-linux-amd64
... output omitted ...
cp -a apptestctl-v-linux-amd64 apptestctl
====> build
make: Leaving directory '/go/src/apptestctl'
Alternatively, you can build a Darwin client.
$ kubectl exec -it golang -- make build-darwin -C src/apptestctl
make: Entering directory '/go/src/apptestctl'
... output omitted ...
====> apptestctl-v-darwin-amd64
... output omitted ...
cp -a apptestctl-v-darwin-amd64 apptestctl-darwin
====> build-darwin
make: Leaving directory '/go/src/apptestctl'
Either way, you can copy the apptestctl binary to your system and use it from wherever you prefer.
$ kubectl cp golang:/go/src/apptestctl/apptestctl-darwin ./apptestctl
$ kubectl chmod u+x ./apptestctl
Compiling kubectl-gs
Use the same steps to compile the kubectl-gs plugin this time, which will allow us to interact with App Platform. Pay attention to the fact that we'll compile it just for Darwin in this instance.
$ kubectl exec -it golang -- git clone https://github.com/giantswarm/kubectl-gs src/kubectl-gs
Cloning into 'kubectl-gs'...
... output omitted ...
Resolving deltas: 100% (4427/4427), done.

$ kubectl exec -it golang -- make build-darwin -C src/kubectl-gs
make: Entering directory '/go/src/kubectl-gs'
... output omitted ...
====> kubectl-gs-v-darwin-amd64
... output omitted ...
cp -a kubectl-gs-v-darwin-amd64 kubectl-gs-darwin
====> build-darwin
make: Leaving directory '/go/src/kubectl-gs'

$ kubectl cp golang:/go/src/kubectl-gs/kubectl-gs-darwin ./kubectl-gs
$ kubectl chmod u+x ./kubectl-gs
Deploying App Platform via apptestctl
Once we have both tools, apptestctl and kubectl-gs, it's time to bootstrap App Platform. To do that, we'll use the apptestctl bootstrap command.
The command apptestctl bootstrap needs the KUBECONFIG information to access our minikube cluster, so in this case, we will use the command kubectl config view --flatten --minify -o json to obtain it.
Alternatively, we would need to look for the .kube/config file and pass it with the
--kubeconfig-pathoption.
$ ./apptestctl bootstrap --kubeconfig "$(kubectl config view --flatten --minify -o json)"
bootstrapping app platform components
... output omitted ...
app platform components are ready
Once deployed, we can run a few commands to observe the resources created in our cluster.
$ kubectl get deployments -n giantswarm
NAME                      READY   UP-TO-DATE   AVAILABLE   AGE
app-operator              1/1     1            1           1m20s
chart-operator            1/1     1            1           1m20s
chartmuseum-chartmuseum   1/1     1            1           1m20s

# kubectl get catalog -A
NAMESPACE   NAME          CATALOG URL                                   AGE
default     chartmuseum   http://chartmuseum-chartmuseum:8080/charts/   1m25s
default     helm-stable   https://charts.helm.sh/stable/packages/       1m25s
Wait a moment... Where does this Catalog resource come from? The bootstrap process of App Platform creates some CRDs that will support the operators to manage our applications.
$ kubectl get crd
NAME                                          CREATED AT
appcatalogentries.application.giantswarm.io   2022-06-10T15:30:12Z
appcatalogs.application.giantswarm.io         2022-06-10T15:30:12Z
apps.application.giantswarm.io                2022-06-10T15:30:12Z
catalogs.application.giantswarm.io            2022-06-10T15:30:12Z
charts.application.giantswarm.io              2022-06-10T15:30:12Z
In short, once we register a Catalog, several AppCatalogEntries resources will be created. There will be at least one per application and version.
Registering a Catalog
Now, it looks like a great time to see what the kubectl-gs plugin can do for us.
$ kubectl-gs get catalogs
NAME          NAMESPACE   CATALOG URL                                   AGE
chartmuseum   default     http://chartmuseum-chartmuseum:8080/charts/   25m
helm-stable   default     https://charts.helm.sh/stable/packages/       25m
All right, that was maybe not so impressive, but it'll become much more useful when we register our first catalog. Why is that? Because kubectl gs will help us generate the definition of a Catalog resource through its template subcommand.
$ kubectl-gs template catalog --name giantswarm --namespace default \
  --description "Giant Swarm Catalog" --logo http://logo-url        \
  --url https://giantswarm.github.io/giantswarm-catalog
---
apiVersion: application.giantswarm.io/v1alpha1
kind: Catalog
metadata:
  name: giantswarm
  labels:
    application.giantswarm.io/catalog-visibility: public
  namespace: default
spec:
  title: giantswarm
  description: Giant Swarm Catalog
  logoURL: http://logo-url
  storage:
    URL: https://giantswarm.github.io/giantswarm-catalog
    type: helm
Et voilà, our Catalog CRD pointing to a Giant Swarm collection of applications is ready to be deployed into our cluster.
You might have figured out already what each parameter represents. kubectl gs will complain if any of those parameters are missing. Also, pay attention that we didn't use a real logo URL, but if you were using happa, the Giant Swarm Web-UI, would't you like to see a logo identifying your application?
Finally, the URL is the location of the Helm repository from which App Platform will download the applications.
Once we understand what the kubectl gs template command has generated, it's time to create it inside the cluster and let the App Operator do its magic. Let's go for it.
$ kubectl-gs template catalog --name giantswarm --namespace default \
  --description "Giant Swarm Catalog" --logo http://logo-url        \
  --url https://giantswarm.github.io/giantswarm-catalog | kubectl apply -f -
catalog.application.giantswarm.io/giantswarm created

$ kubectl-gs get catalogs
NAME          NAMESPACE   CATALOG URL                                       AGE
chartmuseum   default     http://chartmuseum-chartmuseum:8080/charts/       35m
helm-stable   default     https://charts.helm.sh/stable/packages/           35m
giantswarm    default     https://giantswarm.github.io/giantswarm-catalog   53s

$ kubectl gs get catalog giantswarm
CATALOG      APP NAME                           VERSION      UPSTREAM VERSION   AGE     DESCRIPTION
... output omitted ...
giantswarm   falco-app                          0.3.2        0.0.1              5m26s   A Helm chart for falco
... output omitted ...
Do you remember the aforementioned AppCatalogEntries that the App Operator had to create once we defined the Catalog? Here are the Falco ones.
$ kubectl get AppCatalogEntries | grep falco-app
giantswarm-falco-app-0.1.2                               giantswarm   falco-app                          0.1.2          0.0.1              240d
giantswarm-falco-app-0.2.0                               giantswarm   falco-app                          0.2.0          0.0.1              176d
giantswarm-falco-app-0.3.0                               giantswarm   falco-app                          0.3.0          0.0.1              103d
giantswarm-falco-app-0.3.1                               giantswarm   falco-app                          0.3.1          0.0.1              94d
giantswarm-falco-app-0.3.2                               giantswarm   falco-app                          0.3.2          0.0.1              79d
Installing an App from the App Catalog
What we've done so far was deploy App Platform, which is required only once. Giant Swarm would have configured that for us already if we were using their services.
Now, it's finally time to create the CRD that will trigger the App Operator to assist in the deployment of Falco. How do we do that? kubectl gs comes to the rescue again!
$ kubectl gs template app --catalog giantswarm --name falco-app --namespace falco-ns
  --version 0.3.2 --app-name my-falco --in-cluster
---
apiVersion: application.giantswarm.io/v1alpha1
kind: App
metadata:
  name: my-falco
  labels:
    app-operator.giantswarm.io/version: 0.0.0
  namespace: falco-ns
spec:
  name: falco-app
  version: 0.3.2
  namespace: falco-ns
  kubeConfig:
    inCluster: true
  catalog: giantswarm
It is worth mentioning that we are testing on a minikube cluster, where we install applications inside the cluster itself. To achieve that, we use the --in-cluster parameter passed to the previous commands.
Otherwise, if we wanted to install or update the application in one of our managed workload clusters, we would use the --cluster parameter to indicate where the application should be deployed:
$ kubectl gs template app --catalog giantswarm --name falco-app --namespace falco-ns \
  --version 0.3.2 --cluster cluster-123 --app-name my-falco
---
apiVersion: application.giantswarm.io/v1alpha1
kind: App
metadata:
  name: my-falco
  namespace: cluster-123
spec:
  name: falco-app
  version: 0.3.2
  namespace: falco-ns
  kubeConfig:
    inCluster: false
  catalog: giantswarm
In the previous output, you can see how the namespace field inside the metadata section receives the name of the cluster instead of the actual namespace where the application should reside.
The reason is that, although the application will be installed on one of the workload clusters, this CRD will be created in a namespace inside the management cluster. This topic alone would be enough for a whole new post.
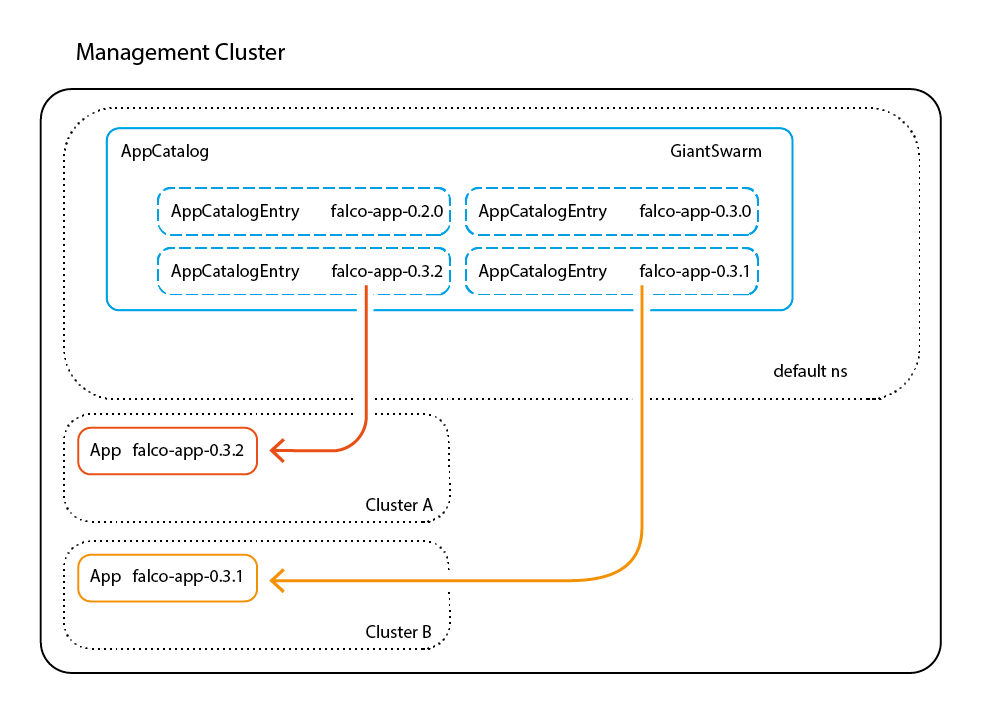
Here is a graphical representation of the CRDs supporting App Platform, in the management cluster:
Finally, the last step is creating the CRD for the App in the cluster. Don't forget to ensure that the namespace where the CRD will belong exists, or the kubectl apply command will fail.
$ kubectl create ns falco-ns
namespace/falco-ns created

$ kubectl gs template app --catalog giantswarm --name falco-app --namespace falco-ns \
  --version 0.3.2 --in-cluster --app-name my-falco | kubectl apply -f-
app.application.giantswarm.io/my-falco created

$ kubectl gs get app -n falco-ns
NAME       VERSION   LAST DEPLOYED   STATUS     NOTES
my-falco   0.3.2     113s            deployed
Here are the resulting Kubernetes resources when using regular kubectl commands.
$ kubectl get app,deployment,daemonset -n falco-ns
NAME                                     INSTALLED VERSION   CREATED AT   LAST DEPLOYED   STATUS
app.application.giantswarm.io/my-falco   0.3.2               4m25s        4m24s           deployed

NAME                                     READY   UP-TO-DATE   AVAILABLE   AGE
deployment.apps/my-falco-falcosidekick   2/2     2            2           4m24s

NAME                                     DESIRED   CURRENT   READY   UP-TO-DATE   AVAILABLE   NODE SELECTOR   AGE
daemonset.apps/my-falco                  1         1         1       1            1           <none>          4m24s
daemonset.apps/my-falco-falco-exporter   1         1         1       1            1           <none>          4m24s
The previous output might differ depending on the type of cluster you would be using, among other variables.
As you can see, once App Platform is up and running, we only need to create the namespace that should contain the Falco application (which should already exist if we are deploying from a managed workload cluster), and the CRD based on the template from the kubectl gs plugin. In a matter of seconds, Falco will be up and running, watching for threats and alerting when suspicious behaviors arise.
Managed Security
Zach Stone, Platform Engineer at Giant Swarm, walked us through some of the biggest challenges that the company's customers face and how his team is using Falco to develop thoughtful solutions.
“The biggest problem that most of our customers face isn't what happens in the cluster, it's what happens with the information once they get it out of the cluster,” asserted Stone. “People also focus too much on the capability that a tool offers and don't take a bigger look at the security processes it supports.”
“If a customer has a vulnerability management program, we can track all of the vulnerabilities in their components, but if fixing those vulnerabilities isn’t a priority, then the program doesn’t work,” remarked Stone. "The larger discussion is usually about where the alerts should go, who bears responsibility for remediation, and how to fit that work into the team's limited capacity. We spend a lot of time trying to ensure security isn't just something that sits alongside the business, but rather is a meaningful part of the daily routine."
Part of that effort is in tuning detection rules and alerting. "Any time we surface an alert, it should be actionable and have a clear owner who is invested in never seeing that alert again."
“I think Falco's superpower is in the flexibility of the policies. I'm also really excited about the changes that are slated to make it easier to update them. Most rules aren't one-size-fits-all -- for a given policy, there is usually some refinement needed to ensure the policy makes sense within our platform, and then customers modify it even further to meet their security requirements. All that customization can make it incredibly difficult to reconcile,” said Stone. “The fact that we can already do it with Falco speaks volumes about the versatility of the solution.”
Security Pack
Giant Swarm's Security Pack is a collection of open-source security tools offered by Giant Swarm, which not only contains Falco but also a plethora of other open-source projects, including Kyverno for policy enforcement, Trivy for image scanning, and Cosign for image signature verification.
Security does not apply to a single level and, therefore, Security Pack consists of multiple applications, each one independently installable and configurable, available via their App Platform. “Falco will be the cornerstone of our node-level security capabilities,” affirmed Stone, “the biggest opportunity for API plug-ins I see is to get feedback from the node level back into the Security Pack so that we can further contextualize events in the ecosystem.”
Conclusion
Adding simplicity to our cluster management is considered a requirement nowadays, especially in those cases where the lack of resources in an organization can keep it from achieving an acceptable level of security.
Features like Giant Swarm's App Platform and Security Pack will help organizations to finally focus on what actually matters to them: Running their business. In the future, Giant Swarm plans to launch its security pack across all its customers' clusters, enabled by default and built on Falco.